Bargain Lashes Where You Least Expect Them

So I had a meeting in a terribly desolate part of the burbs (East Scarborough) and on my way home, I had to pop in quickly at the Perfume Outlet store on the corner (no word of a lie, it really was called this) because… well it was an outlet store!  I love a good deal lol what else can I say?!

So in I go, I walk around, lots of stuff looks crappy… but they have 1 bin full of, in the far back corner, fake eyelashes! and sure they had some almost regular styles but the best thing was the crazy colourful, pretty, costumey ones! They were named Fairy Lashes, Pixie Lashes, etc. And so cute!

My mind is going a mile a minute and I grab a few different styles and decide that I really don’t need them so 4 should be enough for now. I also thought they were $2 each since the bin was marked as such and didn’t feel like paying more than that (which is about 1/3 of the regular price anyhow, since these lashes usually come out right before Halloween for about $6-8 in the drugstore).

Well was I in for a shock. They were 2 pairs for $1. Had I known, I would have raided them. But after all that I didn’t feel like going back and waiting in line again behind all the perfume bargain hunters. So I took my 4 pairs and left feeling quite happy! How perfect for Caribana are they!? My mass-playing clients will look extra fun this year! So excited!

Have you had a special “surprise” sale happen to you lately? which item/where was it? Share the story!

My new favourite HAIR thing!

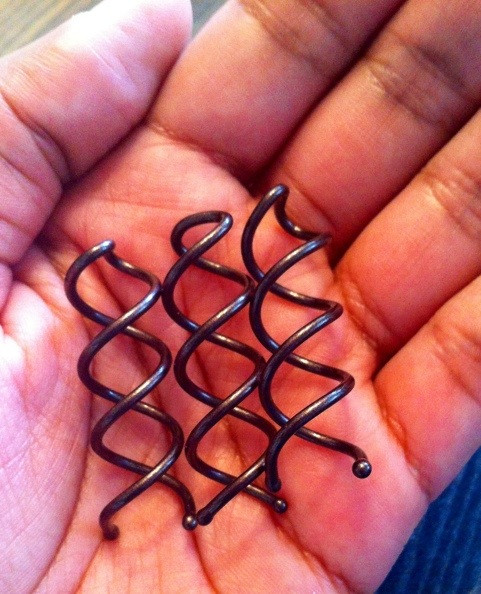
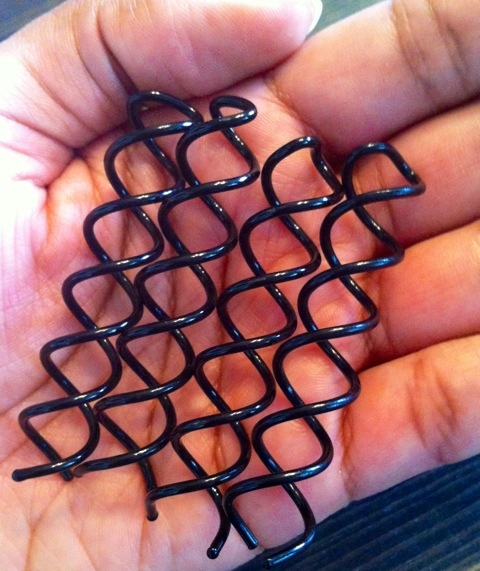
A couple months ago, I saw a video ad somewhere (can’t recall where) for a new hair styling product by Goody. They were called “Spin Pins” and have this double helix type shape to twist into hair during up-do’s to hold hair securely in place. The hair artist demonstrating them said that one of these bad boys replaces the equivalent of 20 (twenty?!?!) traditional bobby pins. I was sold.

I spotted them in Walmart for about $7 at that time, although now the current price is $5. There are 2 colours in them, a burnished silver type colour for light hair & a dark brown for… You guessed it. It also came in 2 package variations, 1 with 2 large pins or 1 with 3 small pins.

I picked up the pack of dark brown small Spin Pins from Goody & tried them out. They were great! They are super sturdy & strong, easy to use & blend well to hair. But, I wish I had bought the long ones because even for mid-length hair like my own, I think nearly everyone would do best with the longer length. They don’t replace 20 pins like the ad-artist said but they replace about 5-6 which still makes it a fantastic & worthwhile hair product. This was ALMOST about to be my new favourite thing. Almost.

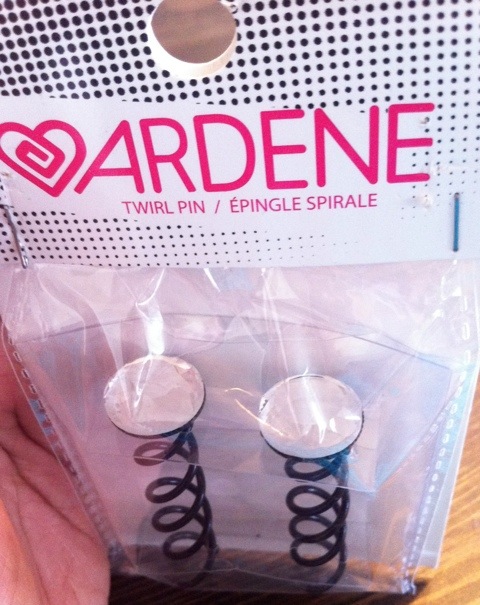
Then I dropped in to my local Ardene store a couple weeks ago & saw, none other than the most fabulous dupe: Twirl Pins. Ardene had these in packs of 4 long ones in either black or burnished silver at $3.50/pack or 5 packs for $10. Can’t beat that! On top of it, they also had some fabulous decorated ones with either pearls or Gemstones (like in my photo) with the long length & in packs of 2 for $3.50/pack or 5 packs for $10. Perfect for bridal hair!

I raided all their racks & purchased every pack. And I feel a little naughty for taking them all. But I also feel quite pleased with myself for finding this great dupe!

If you do bridal or prom hair or have your own big event coming up, be sure to get a few of these for your hair & you won’t have any worries about hair flubs during your event!

Have you tried these yet? Tell me about your experience!

20120425-173521.jpg

20120425-173529.jpg

20120425-173537.jpg

Wedding Day Checklist! How to be Hair & Makeup Ready

These tips will help you prepare so that you’ll have an easy, smooth wedding makeup and hair experience on the day of your wedding. Follow my ten tips and you’ll be able to sit back comfortably and relax while you’re makeup and hair artist gets you gorgeous for your big day. There are also a few do’s & don’ts so make sure you know all the ins & outs!

1. Wash your face the night before and remove all traces of makeup. Cleanse and moisturize your face the day of the trial and do not apply any makeup. This give the makeup artist a clean canvas to work.

2. Do any colour touch ups to your hair about 1 week prior to the wedding day. Freshly cut hair may be harder to style in certain styles so be sure to make hair cuts very simple and not too drastic as this could affect your hairstylist’s ability to create your wedding style. Wash your hair and blow-dry it the day before the wedding. Make sure the hair is clean, product free and dry on the morning of the wedding.

3. Any facials/microdermabrasions should be done 2 weeks prior and waxing/threading should be done 2 days prior to the wedding day because makeup doesn’t adhere as well to freshly waxed or harshly exfoliated skin.

4. Set up an area for the makeup artist/hair stylist to work on, on the wedding day. You should set up a table across from a window with lots of natural light coming in and near to a power outlet to plug in curling irons/straightening irons, etc.

5. If you’re using a tiara/hair crystals/jewel combs/flowers, etc, be sure to lay them out for the hairstylist on that morning so that everything will be in arms reach and will go smoothly. Also if you’re using a veil, be sure that it is steamed and hung nearby to where the hairstylist is working.

6. If you have photos of the makeup or hairstyle, lay them out where the makeup artist/hair stylist will be working so them can have a visual of the look you decided on as they work (unless you had a trial, in which case the artist should know and have photos of, the look you chose at the trial).

7. If you are incorporating any wedding colours into your makeup, be sure to lay out your bouquet, or your cloth swatch so the makeup artist will be sure to get you a perfect colour match. (This is also essential for the bridesmaids/MOTB/MOTG, etc.)

8. If there are any specialty items you want the makeup artist to use, be sure to have them laid out that morning (such as bindis, specialty eyelashes, etc) that way you won’t need to hunt around for them in the middle of your hair or makeup being done.

9. If you’re using any special makeup products that you are supplying (such as a particular face cream or foundation that you really love or a product that is specific to your sensitive or allergy prone skin), be sure to lay those items out on the day of the wedding.

10. Pack a face-kit. If you haven’t hired your makeup artist to come back and touch you up for the reception or for the pictures after the ceremony, then be prepared to have one of your bridemaids or the MOTB stick a few items in their purse for you. You should pack: a lipstick in the same colour you’re wearing (lipstick will wear longer than lipgloss), a lipgloss for layering colour if you’re going for a glossy look, blotting papers (I love the ones from Clean & Clear or NYX because they absorb oil without adding powder to your face), a pressed powder (use sparingly on shiny areas only), some bobby pins (just in case you get a fly-away), and a waterproof dark eyeliner pencil if you’re going from a morning/afternoon ceremony to an evening reception and need to quickly amp up your look.

*This next one all depends on your artist. Many artists ask to be paid in full prior to the wedding date. Others ask for a retainer and that the balance be paid in cash on the site when services are being done for the bride/bridal party. If the latter is the case:

11. Be prepared to pay your artist! Ensure that you have collected all the cash from your bridesmaids or if you are gifting services, ensure that all the money is put together in one envelope with no change being required from the Artist. This is usually best handled by the MOTB or the Maid of Honour so that the Bride doesn’t need to be bothered with that and so that the Artist doesn’t need to go running around asking about being paid when the morning is already hectic enough.

12. Remember, it is customary to tip, although not mandatory. Think of it like a salon service that was mobile, you would tip your hair dresser or colourist or esthetician if you enjoyed their services, so if you love what they did, then remember that services well-done should receive a tip. And if you have paid the balance in full before the date, there is still no reason not to put an additional 10-25% into an envelope with which to tip your Makeup and/or Hair Artists.

13. Make sure you get a business card from your artist and mailing address so you can add them to your thank-you card list afterwards, to help them for making you gorgeous on your wedding day.

Bridal Trial Checklist!

The number one thing to remember during your bridal trial prep, is that you want to feel comfortable, prepared and have peace of mind so that on your wedding day, you’ll have no mishaps or surprises and you’ll know exactly what to expect from your hair and makeup artist. These ten tips will help you prepare for your bridal trial with your makeup artist and/or hair stylist.

1. Wash your face the night before and remove all traces of makeup. Cleanse and moisturize your face the day of the trial and do not apply any makeup. This give the makeup artist a clean canvas to work on during the trial.

2. Wash you hair and blow-dry it the day before the trial. Make sure the hair is clean and product free and dry when you arrive for your hair trial.

3. Any waxing/threading should be done 2 days prior to the makeup trial (facials/microdermabrasions may need 10-14 days depending on your skin sensitivity) because makeup doesn’t adhere as well to freshly waxed or harshly exfoliated skin.

4. If you have any ideas of the makeup or hair style you want to have on your wedding day, bring photos with you to your trial. That way the artist can get a clear idea of what you’re looking for and make sure that you’re getting the look you want on your special day.

5. Bring a photo of your wedding dress/outfit, bouquet and/or bridesmaid dresses (or a cloth swatch) with you to your trial so that if you want to incorporate any of the wedding colours into your makeup look, the makeup artist can be sure to colour match you for the perfect look.

6. If you’re planning on having a tiara/veil/hair combs/hair crystals/flowers in your hair on the day of the wedding, be sure to bring those items with you so the hair stylist can position your pieces into your hair to see what feels comfortable for you so on the day of the wedding, your hair pieces will be sure to stay comfortably in place.

7. If there are any specialty items you want the makeup artist to use, be sure to bring them with you. Things like bindis/gems or specialty false lashes are things you want to make sure to try out before the wedding day to make sure you get the look just right and you’re comfortable with the look and feel of everything.

8. If you plan to discuss the makeup and hair you want done for your bridesmaids/bridal party on your wedding, bring any additional photos with you to the trial so you can set a aside a few minutes to discuss those details with your makeup/hair artist that way there won’t be any surprises for you on the wedding day with regard to how any of your bridesmaids look. It’s also always a good idea to choose one look for makeup and hair for all the bridesmaids to give your party a more uniformed and classy look.

9. If there’s anything else that you want the makeup/hair artist to know, such as special makeup products that you need to be use or that you will bring for them to use, if you have any skin allergies or makeup sensitivity, etc. please use the opportunity to discuss all of those details with your artist during the trial so that you’ll have no surprises or mishaps on the day of the wedding.

10. Bring your camera! Capture a few shots of yourself so that you can go home and review your look and take a few days to decide which look you liked best. That way you won’t feel rushed on the day of the trial to make a decision plus you get to see how your makeup could photograph so you’ll know exactly what to expect on your wedding day.

This is an add-on depending on your makeup artist, but…

11. Be prepared to sign a contract and leave a retainer for services (typically 25-50%) in order to secure your date. Most artists give you a 24-48 hour grace period to email the contract and wire your retainer after the trial, but if you liked the service and skills, be prepared to book on the spot in cash (many do not accept cheques).

Best thing since sliced bread.

A concealor question answered: Yes, Eve Pearl “Salmon” concealor is probably the best thing on the market since sliced bread. It works with an orangey tinge to combat blueish undereye circles (according to the colour chart, this is the opposite of blue, therefore neutralizes the dark circles). You can order it here: http://www.evepearl.com/products/concealers-salmon/ and if you have their professional discount which you can get here: http://www.evepearl.com/professionals_register/ and it gives you a 30-40% discount if you have the appropriate pro credentials.

BUT, although I have tried it, and have loved it…. there are dupes.

Amazing dupes.

One dupe that I have tried and love, and lives in my personal kit, is from Bobbi Brown. It’s here: http://www.bobbibrowncosmetics.com/product/2335/15905/Makeup/Face/Correctors-Concealers/Corrector/SS11/index.tmpl  at a cost of about $10 less and works miracles. Professionally, I recommend going with light peach, peach or dark peach if you are combatting bags under the eyes. I purchase mine at the MAC Warehouse sale for $9 which was money very well spent! I have the dark peach corrector (NOT CONCEALOR!) shade for my caramel skin and it looks AMAZING. I have had several compliments on my even skin tone and flawless face since purchasing and using it. It’s also quite creamy, so good for any normal or dry skin or aging skin, not particularly recommended for oily skin. (Bobbi Brown has a pro program for artists in the USA for 40% off, but it is not valid for Canadian artists. It’s here: http://www.bobbibrowncosmetics.com/cms/pro/bobbipro_apply.tmpl)

My other dupe that I have tried and love, and lives in my professional kit is from Joe Blasco. I ordered it here: http://camerareadycosmetics.com/products/joe-blasco-neutralizers-and-tattoo-cover.html since I have their discount which saves me about $2 I think off the cost of this stuff (not to mention all the other stuff I buy there!). I use it in my kit just the same as the Eve Pearl Salmon concealor and I have both shades for under eye circles, the “blue neutralizer” and the “special blue neutralizer”.

I have no idea why one is more special than the other. The one that is “special” just seems a tad more orangey and is perfect for darker skin tones while the regular blue neutralizer is better for lighter skin tones. IMO. This stuff is 1/4 of the cost of the Eve Pearl concealor and EP’s is 6.2 grams, while the Joe Blasco neutralizers are 6.5 grams. Not only does it work just as well, but it’s also wayyyyy cheaper and you get more product?! Sold.