The Wedding day: How long should I plan for Make-up and/or Hair Services?

Great tips on wedding day timeline planning for brides-to-be!

Vancouver Bridal Hub

Your wedding is a big event already, you want to ensure your day is Fun and Relaxed. Having mobile Beauty services come to you, along with all your friends/family at your side is just another enjoyable part of it all.

Candice from Michigan touched base and wrote us;

“I came across your site and I think your articles for brides are fantastic! I got married last year, and let’s just say the timeline was chaotic. I was over an hour late! Truth – because I didn’t plan out my morning the best. I tried to do salon services for Hair AND at home services for the Girls Makeup, and truly thought I didn’t need as much time as everyone told me. I was wrong.

I was reading your timeline posts and have a friend getting married in a few months (June). Would you be able to do a post in…

View original post 976 more words

Product Review! Ojon “damage reverse™ restorative hair treatment”

I purchased the “Damage Reverse Restorative Hair Treatment” by Ojon as a sale item at the MAC Warehouse sale(blog + pics here: http://wp.me/p2efXc-1w) back in March. It was one of the many items in my haul that I was super excited to try. It was a steal: I purchased the 50ml size for $4 which normally retails for $22 here in Canada.

Now I have curly hair. Curly, ringlety hair. It’s not to thick, it’s not at all coarse, but it does get dry. Especially since I have caramel hilights. And we all know what dyeing can do to already dry hair.

I tried this product on dry hair, as it recommended. I took small teaspoon sized amounts into my hands, melted the waxy substance by rubbing it together in my palms, applying the oil to the hair, and repeating until fully saturated. It took about 1/4 of the jar to ‘fully saturate’ by mid-back length dry, damaged, and normal-thickness hair. I combed it through, put on a disposable shower cap, went under the blow dryer for 5 minutes, and let it sit for about 2 more hours.

Afterwards, I washed it out as normal with my sulfate free, argan oil-infused shampoo and conditioner and proceeded to blowdry and flat iron my hair.

My hair did not feel softer, smoother, more hydrated, or in any way healthier than before using the treatment. In fact, my hair felt hard and straw-like. I was not impressed.

I would have been better off applying warm coconut oil, palm oil or olive oil to my hair as a conditioning treatment instead of using this product. I would actually say that this is the worst hair product of it’s kind that I have ever tried. It smelled like cigarettes & chocolate (very odd combination), it was time consuming to apply and use, and it did not yield any of the results it promised. I also used 1/4 of the product in a single use, which means for $22 you’re getting 4 uses out of this product on the average head of hair. I can get more uses out of a bottle of coconut oil at the West Indian Grocery Store and it would cost me less than half of what this product is priced at.

The good thing about this experience? Well, there are 2 good things: One, atleast I’ll be able to attract every nicotine addict and chocolate-loving child within a 5 mile radius based on the aroma of my hair and Two, atleast it only cost me $4 to make this mistake. Coulda been much worse.


Have you tried this product? Let me know what your experience was and what you thought of it!


Models: How to Arrive Hair & Makeup Ready!

As a makeup artist, hairstylist & often times stand-in wardrobe personnel, there are some things I sometimes wish a model would have done to properly prepare herself, her skin & her hair for a shoot. This is a quick checklist to make sure you’re bringing everything you need and doing everything possible to ensure your shoot goes smoothly, your pictures look fab & your hair and makeup are perfection.

Please arrive:

1: on time. Do not flake. You may be blacklisted & that team/photographer/MUAH may choose to never work with you again. Especially if it’s a TF shoot. If you’re going to be late, call. And text. Don’t send an email or MM message. Call or text directly. Communicating with your crew is vital, even if it’s just to say that your subway train is delayed 10 minutes.

2: braless or with a strapless bra or tube top on. If you are wearing a bra with straps, the straps will leave marks on your skin and may take a while to disappear after you arrive. If you’re shooting fashion or topless beauty shots, it may be best to arrive braless to avoid all skin markings. Please bring & wear a nude gstring and a black gstring. For more tips on what to pack in your bag for both male & female models, please read this.

3: with no makeup on. None. Just a clean & lightly moisturized face please.

4: hair-free. Take care of any unwanted facial hair 2 days before… freshly waxed skin doesn’t allow makeup to stick to it the same as unwaxed skin, so the face may look uneven. This includes tidying eyebrows & removing upper lip hair, excessive sideburns or chin hairs as needed. Remove all under arm hair & have freshly shaved legs up to the bikini line 1 day prior (incase there are any nicks or irritation bumps or redness that need 24 hours to vanish). This also applies to men: make sure you’ve had a proper haircut (if required to look well-manicured) within 3 days prior to your shoot. Shave and shape your facial hair accordingly. Don’t forget! Trim that back of neck hair, armpit hair, groin hair, and any other long and lengthy hairs we do not want to see. Men being hairy is cool, but men looking like a Sasquatch is not.

5: like you’ve got 20/20 vision. If you wear glasses, please take them off at least 1 hour before the shoot to get rid of the nose pad marks or just wear your contacts. But always bring an extra contact case & solution in case you need to pop them out.

6: with clean, dry hair. Preferably washed the night before, no product in it and no flat ironing please, unless you have kinky/highly textured or relaxed hair then please care for it as discussed prior to the shoot. If you have a wig or weave or clip in hair extensions, make sure it has been washed & styled properly. Do not show up with a ratty looking wig or extensions and expect miracles! Also, styling extensions can be like styling 2 heads of hair on a model, so coming with them properly treated can save a lot of prep time, meaning more time for you in front of the camera!

7: smooth as a baby’s bum.  Please ensure your skin has been exfoliated & black heads/white heads removed the night or 2 before. Smooth skin is key for a beauty shoot.

8: no-ash. All body skin should be well moisturized with lotion, no oil as it leaves residue on clothing garments.

9: not in your Sunday’s Best.  Please wear a button or zip down shirt to the shoot in a dark colour to wear while you have your hair & makeup done, or bring a robe. Something you don’t mind getting makeup or powder on.

10: the same. Do not make any crazy changes to yourself after you have been cast for the shoot! This means, don’t go tanning, don’t get 5 inch acrylic nails, don’t change your hair colour, don’t get a drastic haircut, don’t get more tattoos or piercings, and don’t gain or lose any weight. Unless you’ve discussed any of these changes with the shoot organizer/photographer, do not make any changes to yourself once you have been cast. The shoot depends on you showing up looking like you looked when you were given the job, so no changes please.

Coming prepped saves time, money and mostly… it makes you look more professional and desirable to work with again. With this list, you are now ready!

Models: What to Bring to a Test/Portfolio Shoot?

There are a few things models should always have with them, even if there is a full crew expected at the shoot. Heaven forbid, but if your hairstylist doesn’t show & you showed up looking like you’ve got sex-hair, the shoot is about to be a disaster. So, if you pack the following things, you should be good in a pinch no matter what disasters strike!

Please bring:


1: a good attitude. No, not a hungover attitude. A good, wide awake, energetic, ready-to-pose positive type attitude 🙂


2: makeup. These items are your basics & should be in your bag incase the MUA is not there. Items with * beside them include both male & female models.

~foundation*

~concealor

~translucent/anti-shine setting powder*

~clear brow gel*

~mascara

~eyeliner (black, white & a colour to match your brows)

~eyeshadows (neutral brown, black, shimmery white or gold if you are an ebony toned model)

~blush (a peach tone & a pink tone that flatters you, no shimmer)

~bronzer* (no shimmer)

~lip balm*

~lipstick (one nude, one red, one soft pink, one deep brown/deep plum/deep burgundy)


3: directions and phone numbers. Don’t just store them in your iPhone, print them and pack them in your bag. If you get lost & have no reception or your phone dies, you can still go to a gas station or ask a transit personnel for directions. Or if you have the numbers of the crew written down, you can call from a payphone to let everyone know you’ll be arriving a bit late.


4: hair things.

~flatiron. Preferably a round barrel that can do both straightening and curls.

~hairspray

~texturizer/messy hold gel*

~a hair elastic & bobby pins


5: clothing. Always bring the basics, even if wardrobe is provided. I have seen it happen so many times where we have used a model’s white tank or leggings.

~leggings

~skinny jeans (slim jeans for the men)*

~white tank*

~white tee if you’re ivory-medium/black tee if you’re medium-ebony*

~g strings. black, white & nude. not thongs with those thick straps in the back. g strings.

~bras. strapless in nude/black/white. pushup in nude/black/white. at the very minimum you need these 2 types.

~white or denim button down shirt*

~nylons/pantyhose, 1 nude & 1 black

~a blazer/leather jacket*

~a pencil skirt

~ 3 pairs of shoes, minimum. 1 classic black/dressy. 1 bold & trendy. 1 casual (flats, boat shoe, etc. Runners don’t count)*

~accessories. a hat, a tie, suspenders, jewelry, etc. Whatever you have that you like & is vintage, classic, or ultra trendy. Leave stuff from 3 seasons ago at home.*


6: clean nails. Nails should be freshly manicured on hands & toes with a clear or neutral lacquer. No lacquer required for men.*


7: snacks. There may be no break or it may be a long time before dinner. Bring things like fruit or veggie sticks, protein drink, granola bar, cheese wedges, etc. Nothing greasy or carbonated (which could leave your waistline bloated in photos).


8: iPod. Bring music you love. Play it while you model. Put stuff on it that will get you in the right kind of mood for your shoot. Somber, upbeat, grunge… whatever does the trick. And even if you can’t play it in the studio (for whatever reason), you can pop on your headphones in between changes and get re-focused and re-charged.


9: safety pins. Always.


10: your business card/comp card. You just never know who you might meet 😉

Better than “Mixed Chicks”?? Say what?!

Yep, I found a leave-in conditioner that is better, I repeat – BETTER – than the Mixed Chicks brand coveted leave-in conditioner and de-frizzer for curly hair types.

I really like Mixed Chicks, I do. I have even used it in my daughter’s hair which has about 3x the twisty-curl factor than my own hair does. It works really well. But I found a product that works even BETTER.

Recently, I was in Shoppers Drug Mart (I say recently but we all know it’s closer to ‘daily’) helping my friend shop for some deep conditioner for her hair. I have used the ones by L’oreal Expertise, specifically this one (below), the Total Repair 5 and I really liked it. It was moisturizing but not so heavy that it weighed down my hair or gave me that ‘greasy bangs’ look.

So as my friend was grabbing herself some hair mask, I grabbed myself something new (as always) to do a test run. I’ve tried the Nutri-Sleek shampoo & conditioners from the same L’Oreal Expertise brand before and like them, so I decided to give the leave-in conditioner a try.

I have to say, I was amazed by it. It did a BEYOND fabulous job of taming my frizzies and defining my curls without any crunchy gel type feeling AT ALL. It was phenomenal. I only needed a small dollop and it was enough for my whole mid length head of hair. My hair didn’t feel weighed down. AND my boyfriend complimented my yummy smelling hair (it really does smell pretty good, for a styling product anyway).

So, is Mixed Chicks leave-in conditioner great? Yes. Does it do everything it promises? Yes. But, is it available everywhere like in a drugstore or WalMart like L’Oreal Expertise is? No. Is it as cost effective as the L’Oreal Expertise brand is? No again. The Mixed Chicks leave-in conditioner is 300ml for $16.99 (per the website and often sells for much more in stores, especially in boutique hair stores where you might be lucky to find it here in Canada) whereas the L’Oreal Expertise Nutri-Sleek leave-in conditioner is 200ml for $4-6 in most drugstores.

I bought my L’Oreal Expertise Nutri-Sleek leave-in conditioner on sale for $3.99 at SDM AND had $2 off coupons from the company itself to use. That’s right, it was $1.99. I don’t think this could be beat!

If you have thick, wavy, curly, ringlety, corkscrewy, dry, frizzy, dull curls or hair, you probably NEED to get this leave-in conditioner. You just didn’t know it until right now. And with summer coming, a.k.a. “big hair season”, this will probably become your life line.

No, I didn’t forget about you guys! Here’s a link to that $2 off coupon I used: http://www.smartsource.ca/smartsource/index.jsp?Link=RH3NYYVG2LZOY

Now go forth and shop!

Have a fave hair product? Tell me! Want me to put something to the test? Ask away!

My new favourite HAIR thing!

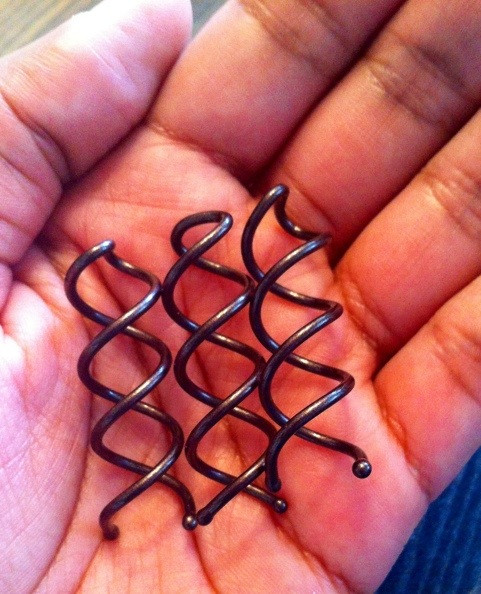
A couple months ago, I saw a video ad somewhere (can’t recall where) for a new hair styling product by Goody. They were called “Spin Pins” and have this double helix type shape to twist into hair during up-do’s to hold hair securely in place. The hair artist demonstrating them said that one of these bad boys replaces the equivalent of 20 (twenty?!?!) traditional bobby pins. I was sold.

I spotted them in Walmart for about $7 at that time, although now the current price is $5. There are 2 colours in them, a burnished silver type colour for light hair & a dark brown for… You guessed it. It also came in 2 package variations, 1 with 2 large pins or 1 with 3 small pins.

I picked up the pack of dark brown small Spin Pins from Goody & tried them out. They were great! They are super sturdy & strong, easy to use & blend well to hair. But, I wish I had bought the long ones because even for mid-length hair like my own, I think nearly everyone would do best with the longer length. They don’t replace 20 pins like the ad-artist said but they replace about 5-6 which still makes it a fantastic & worthwhile hair product. This was ALMOST about to be my new favourite thing. Almost.

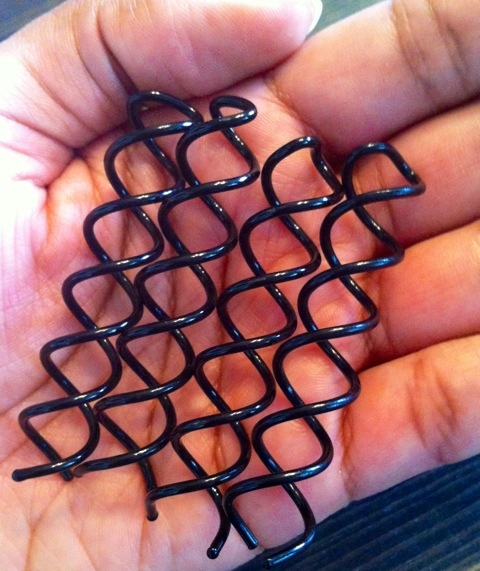
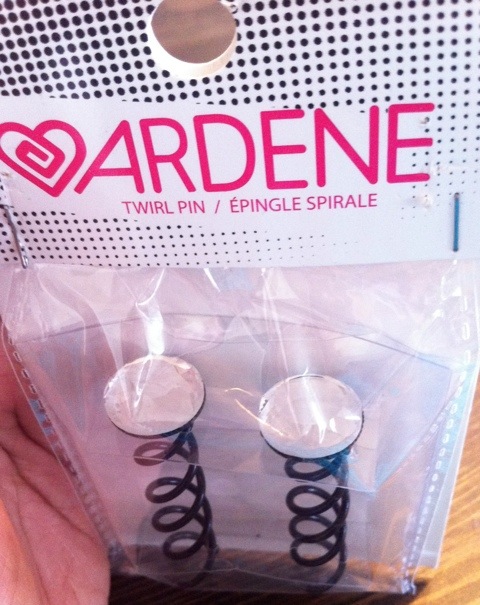
Then I dropped in to my local Ardene store a couple weeks ago & saw, none other than the most fabulous dupe: Twirl Pins. Ardene had these in packs of 4 long ones in either black or burnished silver at $3.50/pack or 5 packs for $10. Can’t beat that! On top of it, they also had some fabulous decorated ones with either pearls or Gemstones (like in my photo) with the long length & in packs of 2 for $3.50/pack or 5 packs for $10. Perfect for bridal hair!

I raided all their racks & purchased every pack. And I feel a little naughty for taking them all. But I also feel quite pleased with myself for finding this great dupe!

If you do bridal or prom hair or have your own big event coming up, be sure to get a few of these for your hair & you won’t have any worries about hair flubs during your event!

Have you tried these yet? Tell me about your experience!

20120425-173521.jpg

20120425-173529.jpg

20120425-173537.jpg

MAC/Estee Lauder Sale HAUL!

This gallery contains 20 photos.

My Trip to the MAC/Estee Lauder Sale… And all the amazing stuff I got! 😀 Pic 1: All Bumble and bumble hair stuff… Straight styling product (50ml), Straight Shampoo (60ml), Creme de Coco conditioner (50ml) and Creme de Coco shampoo … Continue reading

I stopped a man!

Yesterday, I was in the drugstore winding my way through the aisles & went to grab some hair spray for my kit.

Low & behold, a very confuzzled looking man was standing there with 3 different products in his hands. Poor thing! All of the stuff in his hands was complete crap (Dove styling product, some L’oreal studio line hair putty nonsense & some non-descript product I’d never cared to take in before).

I took one look at his sorry self & told him that he should try the styling products by Got2b. I’ve tried nearly all their products which work really well but particularly the spiking gel & freeze hold hairspray (mega yellow can) work WONDERS on men’s hair.

He dropped all the junkie stuff & grabbed 2 Got2b products. I felt like I was a temporary superhero & saved a man from wasting his hair product dollars & also from having really bad hair.

Moral of the story, when it comes to beauty: if YOU know better then help someone else to CHOOSE better!

Have you ever seen someone picking up a terrible beauty product that you just knew wasn’t going to work or had terrible wear & tear or poor pigment? What did you do? Would you be a product superhero too?