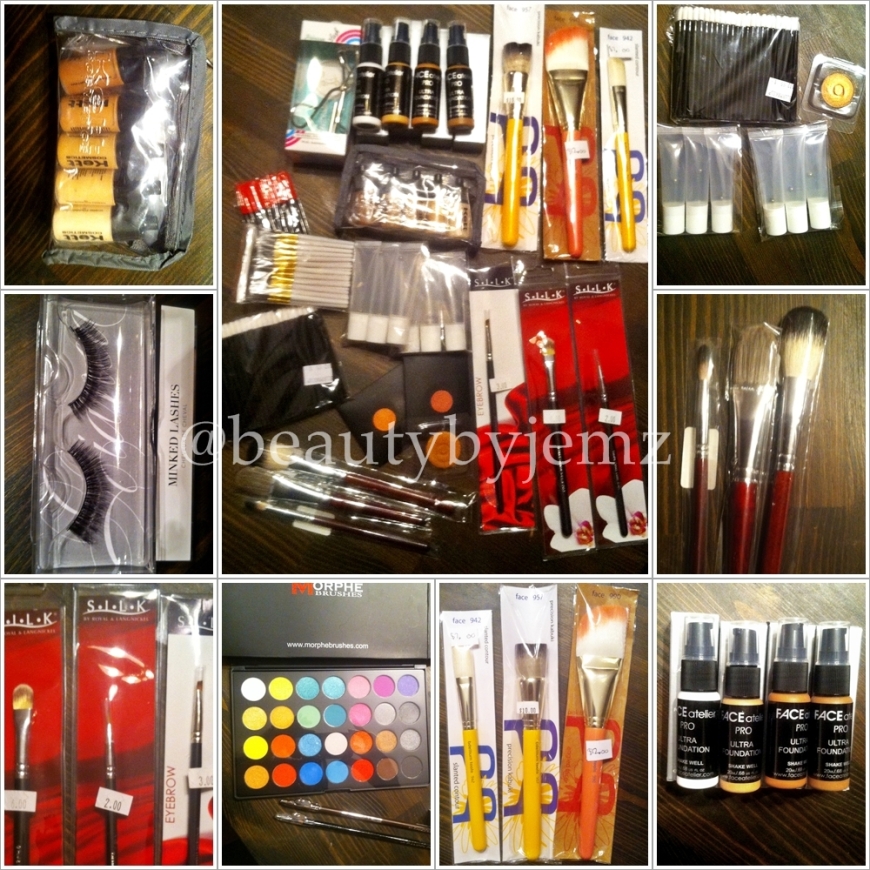
My 2013 IMATS Haul teaser!

So today I was working at the IMATS (International Makeup Artist Trade Show) here in Toronto. I was honestly hoping to post all my pics and prices of everything I got today in my mad dash to snag a few things while working in the FACE atelier booth all day. I just can’t. Guys, I’m so beat. So, I will give you a teaser and just show you a collage of the goodies I grabbed. I will post more details and prices etc. at a later day. 1 SMALL

If you’re going to be at IMATS tomorrow, happy shopping! xo

cats w

My fave MAC Blushes (Swatches)

I am not a brand-whore. Seriously. So no, I do not use all MAC errrythang in my kit. But, I do absolutely love some of their blushes. I find the pigment is great, they are quite smooth and not chalky, … Continue reading

DIY Geometric Manicure

So I stumbled on these 2 links a while back, and decided to make my own “Scotch Tape Manicure”. http://www.buzzfeed.com/peggy/12-amazing-diy-nail-art-designs-using-scotch-tape http://thebeautydepartment.com/2012/04/sticky-situation/ I used, Pinkalicious and Impeccable Greys from Maybelline’s Color Show line as my 2 base colours, then used white, … Continue reading

Want to Make YOUR Best “Natural” Lip Color?

I do lots, and I mean LOTS of photoshoots for models and commercial clients where the #1 look I end up doing is creating a, NOT NUDE, but a “natural” lip tone. This also goes for a fair number of … Continue reading

Dear Santa… I’ve been a very good girl…

Time to round up the amazing beauty buys out there for the Christmas season! Now, I never get presents. Seriously. Nobody ever buys me things for Christmas. I get a lovely card, usually filled with sparkles and Santa stickers from … Continue reading

Thank You Make Up For Ever!

There’s nothing better than the Fed Ex man buzzing at 8:20am to give you a box of makeup goodies. Honestly, he could show up at 4:37am, and I would still be elated. Yay for makeup goodies!!! I Must say… Make … Continue reading

Yaby Liquid Foundation Review

During Yaby Cosmetics‘s pop-up shop in Toronto in August, I picked up the “Natural Finish Liquid Foundation” among other things. I actually ended up using it that very same day on a photoshoot I did for a beauty editorial (seen here).

I purchased 6 shades and felt that was enough to cover any skin tone appropriately with a bit of custom mixing.

My daughter was hanging around and dying to ‘help me’ so I let her use her arm for the swatches. I think some “Hello Kitty” character may be seen in the background, not to mention her very tiny 5 year old arm was a bit tougher to swatch then I’d thought…


So the product…

I noticed that the texture is very light and the consistency is similar to a tinted moisturizer. The product is oil-free, which is likely for the best since I think it suits younger skin types best and it has a cyclomethicone base, thereby making it a great option for those with sensitive, acne prone or very oily skin types.

The product is not overly pigmented (no caking) and provides great very-light to slightly moderate coverage. It needs concealer to really even things out and provides a very nice, light coverage to those with nearly perfect skin or those needing only minimal spot coverage. It layers well but cannot be built up to a full coverage foundation.

It photographs very well and allows the skin texture to show through nicely. I also liked how the tones are very closely matched to real skin tones. The clear tubes also makes it easy to spot and match a shade in a pinch. I also liked the packaging and it’s travel and kit-friendly size. That being said, I noticed some of my tubes are half empty after about 6 uses. However, I must note the cost-effectiveness of the product as it retails for $13.55 and pros can sign up for the discount program for 20% off, bringing your price down to $10.85 (for 0.272 oz of product).

I would not apply this with a sponge and would go the foundation & stippling brush route to avoid the sponge soaking up all the product. It also warms nicely and applies well with fingers.  I also used this foundation on one of my brides recently (who had very good skin). I used my Lise Watier concealer wheel to spot conceal and then used a mixture of shades “caramel” and “custard” to give her a custom match. You can see her lovely face here.

The sum:

I probably wouldn’t use this as a personal use foundation since the coverage cannot be built up to full, and some days you just need that extra ‘oomph!’ BUT I would stock this item in my kit as it is not expensive to keep as a good, light coverage option with great packaging and that is highly photographic and mimics skin texture very well. I’d love to see a full-coverage liquid foundation Yaby!


Is there a product you’d like me to review? Want to see if an item lives up to the hype? Drop me a line!

Thoroughly Impressed By What $3 Got Me

When E.L.F launched their new HD blushes, I was the first in line to make my order! But I noticed that since these new HD blushes were part of the “Studio” line, I could use my handy coupon code for … Continue reading

My Fave Lips for Fall!

All the time, everytime I wear it, everywhere I go… some female always wants it…. my fall 2012 lip colour that is!
So I figured I should post it, since it seems to be a fave with the ladies 😉

FYI, this picture does not do it justice!

It’s 2 parts Maybelline Superstay 14 hour Lipstick in “Wine and Forever #100” and 1 part MAC Dazzleglass in “Get Rich Quick”.

Quick note: No longwear lipstick will last anywhere close to 14 hours if you’ve layered it with a gloss product that was not specifically formulated to work with the particular lipstick. BUT, I love this for the colour, not for the longevity.

The Maybelline Superstay lipsticks have a really smooth and highly pigmented application. The formula doesn’t bleed out or feather on me when applied properly to a nude pencil-lined mouth. It also smells really good (for a lipstick) and doesn’t have a weird taste… bonus! In this shade (Wine & Forever #100) it has a great plummy colour that is closer to the deep purple side rather than the black cherry side. It’s very flattering on warm skin tones and particularly on women of colour.

The MAC Dazzleglass is, like all Dazzleglass products, amazing and light catching and shiny. This shade (Get Rich Quick) is a beautiful raisin colour (plum with hints of red). It looks gorgeous layered over top your dark lipsticks from reds to purples, and on it’s own for a high shine and tint of colour on a nude mouth.

Hope this helps you to get my ‘coveted’ fall lips! Hehe!

xo

Jem

Thanks Face Atelier!

CanPar paid me a visit today and brought me some special FACE atelier goodies! I’m stoked!

FACE atelier Ultra Foundation is one of my absolute favourite liquid foundations. It gives amazing medium to full coverage, is buildable, and has a silicone base so you can save time and skip the priming step! To top it off… it’s a Canadian company! And I sure do love a homegrown product, especially one as amazing as this!

I recently used some FACE atelier products in 2 recent beauty editorials I had published (view MASK here or view Flight & Fury here). The shots and themes were COMPLETELY different from each other, but the thing is that this line is much more versatile than people and artists sometimes think. I use it on brides & clients, in video & photoshoots. Mature skin? No worries, this silky formula ‘floats’ atop the skin and doesn’t exaggerate fine lines by settling in wrinkles. Oily skin? get the Ultra Matte spray and mist a little before & after application to keep yourself shine-free. Dull skin? this stuff leaves a natural dewy look, just be sure to not powder on the whole face and just in the T-zone where needed.

Best of all….. FACE atelier was so kind as to hook me up with some professional gratis with my favourite items from their line!

I got the Ultra Foundation in 0-, 2, 4, 6, 8, 0+ a.k.a. 10, and 12 and the Ultra Matte spray. Covers every skin tone! And with 0- and 0+ you can customize the colour best for you (or your client). Enjoy the pics and the swatches!

Thanks again FACE atelier!

xo Jem

Z Palette SALE!

Attention bargain beauty lovers….

Z-Palette is having a sale on their small palettes! 20% off the regular price of $14.00 starting at MIDNIGHT TONIGHT! And I have been eyeing up those hot-pink minis since that new colour launched!

These are fabulous little wonders that save loads of space in your kit if you’re a pro or in your bathroom if you’re a makeup loving regular gal! See my Z-Palette musings here… or over here for more!

Don’t forget to pick up your magnetic stickers for those non-magnetized items!

NEW HD Blushes by E.L.F. and 50% off Coupon HERE!

e.l.f. Cosmetics Has JUST launched their line of HD blushes! Look a little similar to the Make Up For Ever kind? They definitely look similar, but they are only a FRACTION of the price at $3.00 a pop! I’ve just … Continue reading

Bridal FAQ

Brides ask a ton of questions… the poor things are so bogged down with wedding plans and price lists, menus and measurements they often lose out on the details. Here are some of the most frequently asked questions I get from my brides, and ones that I hear from fellow MUA’s with many of the same FAQs. Here goes…

1: Do I REALLY need a Makeup Artist? “Becky, my friend from high school is really good at eyeshadow! My sister always does her makeup really well, I’m sure she can do mine! I know, I’ll just go to MAC, get one of the girls to paint my face and then buy all the products, and I’m set!”

No, please do not go with Becky, “sister” or MAC-Lady. Yes, You do REALLY need a Makeup Artist. You need one who understands you, your style, the wedding esthetic, and is a real Professional. Not some girl who likes to play with lipsticks who is ‘really good at eyeshadow’. You need a pro who is good at doing ‘a whole face’.

On your big day, it is imperative that you get a few moments to relax before ceremony time. You want to get an artist who is mobile and will come to you so you have less running around to do on that day. You also want to make sure you did a trial with her before the day of so that the two of you know there is a plan in place. It is going to be your most photographed day of your ENTIRE LIFE. Hire a pro who can make you look good from every angle, in every light, and in your photographs and video. Someone who understands that a bride sweats, gets shiny, kisses people endlessly, and needs to stand out above everyone else in her photos. Get an artist who will make you shine, and, make you comfortable and confident in their skills. Even if you pay more for a mobile artist, the relaxation time and worry-free moments prior to the ceremony will be invaluable and is money very, very, well spent.\

2: Why do I need to leave a deposit?

Do all the rest of your bridal contractors take a retainer fee/deposit? Yes they do. It’s because no one wants to have a client retract services at the last minute and leave them high and dry. This happens, especially in a business where a couple sets a budget and often spend several thousand dollars over budget but don’t realize it until the last moment.

Leave your retainer for the date you are booking, and try to pay your balance prior to the date. Some artists ask to be paid the balance 30 days prior to the wedding, others ask that the balance be paid on the day but give you the option to pay in advance if you wish. If you can financially manage it, pay in advance. It’s one less envelop of money to worry about giving out on the big day.

3: Can I negotiate the price? I never budgeted for a makeup/hair artist for the wedding 😦

Firstly, don’t let this happen to you. Budget it in. You’re budgeting in something for everyone else that day from music, tuxes, food, entertainment, etc. so remember to include something just for you in the budget too.

Should you try to negotiate price? Some artists may budge, some may not. Artists who post their rates directly on their websites are usually of the ‘no-nonsense’ types and don’t play games with their vendors. Some Artists use the idea of not having rates public to either try to make contact with a potential client who may not have contacted them because their price is too high for the client or to make an individualized quote depending on how deep a client’s pocket is. You can try to negotiate, but always remember that you get what you pay for. Now if Gina around the way is charging you $10 for ‘just the eyes’ and you’re happy with her, go for it. But you can always find a great artist for a reasonable price. Pricing also depends on your geographical location. Ask a friend and see if that artist will give a referral discount. Book a large party and see if they will throw in the false eyelashes for free. You never know what you may get by negotiating, but in the end, be prepared to pay their worth if they are a worthy Artist.

4: Will you do touch-up services?

Now every artist is different in terms of what they do to perform their job, but professionally, I never recommend that a client do ‘touch-up services’. If a client needs a secondary makeup application, the Artist should start with a clean canvas and do a new application. Piling makeup on top of a sweaty, shiny, oily face is bad for the Artist’s brushes, bad for their makeup, and bad for the client. It will photograph as caked-on, opaque, heavy or even with a big colour difference (especially in women of colour). So no, no touch-up services. Please ask for details regarding a secondary application. If you have many hours between the ceremony and reception, this may be a great add-on for you.

5: I ONLY like ______ products! Do you use______ (<—- Insert consumer brand name cosmetic company here)?

Most artists I know are not brand loyal. We are not interested in selling you the products, we are interested in selling you our skills. Sometimes we may use items that are from a ‘prestige brand’ and sometimes we may use an item that is from the drugstore beauty section, but either way, we use items that perform. Period. An artist may use a Skinfinish by MAC or a blush colour from NARS, but their whole kit & caboodle usually doesn’t come from one place. And the mark of a good artist is someone who uses what WORKS, not just what looks expensive to a client. And therein lies the difference between what an Artist may buy verses what a client may buy. There are some notable differences between Pro brands and Consumer brands which often affects an Artist’s purchasing choices. Consumers often buy products because they are new, exciting, and marketed well. Pros use brands because they work, they perform, they are highly pigmented, waterproof, hypoallergenic, etc. We don’t care if it comes in a jar, bin or bucket. If it works well, we want it. It doesn’t need an expensive name scrawled across the outside packaging to impress us. The fact that our colleagues all talk about how well it performs is proof enough for us.

Also, many, many artists need travel friendly kits so they often downsize by ‘depotting’. This term is used to describe the many ways we artists eliminate heavy and bulky packaging by taking our makeup items (blush, eyeshadow, powder, bronzer, etc) out of their packaging and putting them in flat empty palettes that hold a multitude of items. This saves us on lots of space. Many Artists also downsize liquids  (foundations, liquid bronzers, face cream, toner, etc) by putting them in small 1/8, 1/4, or 1/2 oz bottles to eliminate the heaviness & high possibility of breakage of carrying several glass bottles in our kits. Cream products (lipsticks, concealers, cream foundations) are also often downsized too in all kinds of flat palettes for ease of mixing and, again, to eliminate packaging & weight. Which means when an Artists opens their kit and it’s full of downsized items, they could be any brand: an Artist may be using an Urban Decay eyeshadow, a La Femme blush, a Ben Nye powder, a Joe Blasco concealer, and a Revlon Lipstick… but you hired the artist based on skill, photos of their work or a sound referral from someone who has hired them before so have no worries about what brands they’ve got and trust they will make you as stunning as you’ve hired them to. It doesn’t matter what they’ve used so long as it doesn’t irritate your skin, it lasts all day/night, and you love the look they’ve given you!

6: How do I know you’ll be able to do makeup on my Asian/Indian/Irish/African skin tones? Can you do “Indian” bridal makeup with heavy and dramatic eyes? Can you do “Asian” bridal makeup with a sculpted face? Can you do “African” bridal makeup with deep pigment in the blush and eyeshadows?

If you’ve hired a reputable artist, they SHOULD be able to do makeup effectively on every skin tone and skin type. They SHOULD have all the items in their kit to create any foundation shade to match any client. And they SHOULD be familiar with different cultures and how the makeup is styled differently.

That being said, some artists in more multi-ethnic and multicultural geographic regions may have more skill or more practice doing makeup regularly on a multitude of skin tones and complexions. If you live in a less multicultural area where you have not tried out the Artist you’re considering hiring, you might want to do a trial (ensure you take LOADS of pictures in all kinds of light) or you may want to considering hiring an Artist from a different part of town or a different close-by city. You may need to pay more for them to travel to you, but it would be worth  it to have the peace of mind to know your Artist has the right skills and products to make you look your best.  And at the end of the day, your comfort is the key to a smooth wedding day.

7: I think I want to look like Kim Kardashian! I really want that Nicki Minaj pink lipstick! I really think that I should go for J.Lo’s bronzed complexion for my ivory skin tone, don’t you think?

Remember, you may have an idea in your head of what you want but the Artist’s job is two-fold: one, to help you get the look you want and two, to help ensure the look is balanced, suits your skin tones, features and dress/accessories style, and will photograph wonderfully. So send your makeup artist an email PRIOR to the trial with a photo of yourself and a photo of the look you want. This also means that when you choose photos of looks you like, remember to picture them ON YOU and not on the girl in the photo. If you look like Brandy, but show up with a photo of Jennifer Lopez, please, please understand… You must be realistic about how a look may translate on you and whether or not it will flatter YOU specifically. (Kim K. lashes on a small almond eye? Nicki Minaj pink lipstick on a chocolate coloured lady? White-nude lipgloss on a mature bride? a bird-cage fascinator with an au naturelle curly fro? oh. hell. no.)

8: Can you change my skin colour? Can you change my eye shape?

Some tricks are easier than others. You want poutier lips? Easy. You have Brandy’s complexion but want to look like Beyonce? Harder.

And while we can take a mono-lid and double it, or take a darker complexion and brighten it, at the end of the day, the features you have are YOURS. Be proud of them! It’s what makes you who you are and makes you the person your groom-to-be is excited to marry. Be you on your wedding day!

9: I’m not sure what I want, I think I like these 10 photos of different hair and makeup styles, we can try them ALL and THEN decide on what I like, right?!

Not right. It’s ok to have an idea or two, but a trial is not meant to be a 5 hour session of playing “makeover” with your artist. It’s meant to help your artist determine your look and fine-tune the colours and shades that will be used on your big day, to make sure it photographs well, to ensure colours match the accessories or bouquet, and to ensure your skin’s comfort, and the longevity and wear-ability with the makeup. So do all the Googleing and photo scouring before the trial, so that when you see your artist you can focus on making that one look you have in mind, just perfect!

10: I really want to look amazing on my wedding day, I should try something fresh and new! Right?

Wrong. If you are the girl who is normally wearing heavy eyeliner and a pink lip, how will your Husband-to-be react when he sees you down the aisle in a smokey eye and red lipgloss? Do what suits you but what is also a recognizable style on you. Be you, just a more polished, photographic, and slightly more ‘done up’ version of you. You also want to look timeless and classy. Remember, your grand-kids could be seeing these photos one day and wondering who on earth that woman is standing beside Grandpa. So be the best version of you on your big day.

Now remember, communicating with your Artist is key. So if you have allergies, expectations, photos, or hopes and dreams about your wedding day makeup, share them with your Artist! It’s the only way they can make you gorgeous, happy and glowing on your most celebrated day.
My E.L.F. Makeup Haul!

So… I made an order through ELF makeup on July 10th during their 50% off site wide sale… Today is August 3rd and I JUST got my order. Literally, the postman just left. I am pretty unimpressed about the shipping. I mean, Yes, I am in Canada. BUT I’m also ONLY in Canada, and Toronto at that. It’s not a barren igloo-filled land up here. And our post is quite efficient. So why on Earth did I have to wait 3.5 weeks for my parcel when Camera Ready Cosmetics, in California, can get my order to me in less than 7 business days?! Ok. End rant. I’m not impressed with their shipping, but I know I’ll love what came in the box. And so will you!

Here’s what I got!

I got (left to right):

20 powder brushes

20 travel mirrors

10 “Butternut” eyeshadow quads (for my fair skinned brides)

10 “Luxe” eyeshadow quads (for my medium- dark skinned brides)

Second row, starting left again:

2 flat head powder brushes

1 “Eco tools” dupe foundation brush

2 Synthetic hair foundation brushes

2 concealer brushes

1 “Luminance” bronzer (hilighter)

1 “Matte Bronze” deep bronzer

5 “Brownie Points” Liquid lipstick (light brown)

5 “Strawberry” Liquid lipstick (pink)

5 “Maple Sugar” Liquid lipstick (nude)

5 “Ruby Slippers” Liquid lipstick (soft red)

5 “Baby Lips” Liquid lipstick (pink nude)

5 “Ruby Kiss” Plumping Lip Glaze (fiery bright red)

5 “Fuchsia Fanatic” Plumping Lip Glaze (hot-pink/fuchsia bright pink)

I bought the few individual brushes & bronzers for my kit, but I bought everything else for my bridal beauty bags that I gift/sell to my wedding clients (brides or bridesmaids usually) for them to give themselves touch-ups at their event. Bridal gift bags are a great addition to bridal makeup services and my brides always thank me after their big day!

I am super excited at all the items I got and I got shades I know are popular, neutral and brights, that will flatter all my multi-ethnic clientele.

The only thing I am not excited about is that I ordered an Angled blush brush and a Stippling brush which did not come with my order. But I checked online and it’s still in stock. And I checked my Paypal and they still charged me for them… I’ve contacted their CS by email and we’ll see what happens. I’m disappointed in their oversight, but I’ve been 3.5 weeks worth of patient for my order, so I’m sure a few more days waiting on their email rectifying their mistake, is something I can wait be patient enough to wait on for a few more days.

All in all, I am very happy I finally got my order. And even happier that I took advantage of their 50% off sitewide sale! All of these items… in total… cost just $56. With the extra cost of shipping to Canada, it still only cost me about $70 total. I’m happy, but my bank account is ecstatic.

Models: How to Arrive Hair & Makeup Ready!

As a makeup artist, hairstylist & often times stand-in wardrobe personnel, there are some things I sometimes wish a model would have done to properly prepare herself, her skin & her hair for a shoot. This is a quick checklist to make sure you’re bringing everything you need and doing everything possible to ensure your shoot goes smoothly, your pictures look fab & your hair and makeup are perfection.

Please arrive:

1: on time. Do not flake. You may be blacklisted & that team/photographer/MUAH may choose to never work with you again. Especially if it’s a TF shoot. If you’re going to be late, call. And text. Don’t send an email or MM message. Call or text directly. Communicating with your crew is vital, even if it’s just to say that your subway train is delayed 10 minutes.

2: braless or with a strapless bra or tube top on. If you are wearing a bra with straps, the straps will leave marks on your skin and may take a while to disappear after you arrive. If you’re shooting fashion or topless beauty shots, it may be best to arrive braless to avoid all skin markings. Please bring & wear a nude gstring and a black gstring. For more tips on what to pack in your bag for both male & female models, please read this.

3: with no makeup on. None. Just a clean & lightly moisturized face please.

4: hair-free. Take care of any unwanted facial hair 2 days before… freshly waxed skin doesn’t allow makeup to stick to it the same as unwaxed skin, so the face may look uneven. This includes tidying eyebrows & removing upper lip hair, excessive sideburns or chin hairs as needed. Remove all under arm hair & have freshly shaved legs up to the bikini line 1 day prior (incase there are any nicks or irritation bumps or redness that need 24 hours to vanish). This also applies to men: make sure you’ve had a proper haircut (if required to look well-manicured) within 3 days prior to your shoot. Shave and shape your facial hair accordingly. Don’t forget! Trim that back of neck hair, armpit hair, groin hair, and any other long and lengthy hairs we do not want to see. Men being hairy is cool, but men looking like a Sasquatch is not.

5: like you’ve got 20/20 vision. If you wear glasses, please take them off at least 1 hour before the shoot to get rid of the nose pad marks or just wear your contacts. But always bring an extra contact case & solution in case you need to pop them out.

6: with clean, dry hair. Preferably washed the night before, no product in it and no flat ironing please, unless you have kinky/highly textured or relaxed hair then please care for it as discussed prior to the shoot. If you have a wig or weave or clip in hair extensions, make sure it has been washed & styled properly. Do not show up with a ratty looking wig or extensions and expect miracles! Also, styling extensions can be like styling 2 heads of hair on a model, so coming with them properly treated can save a lot of prep time, meaning more time for you in front of the camera!

7: smooth as a baby’s bum.  Please ensure your skin has been exfoliated & black heads/white heads removed the night or 2 before. Smooth skin is key for a beauty shoot.

8: no-ash. All body skin should be well moisturized with lotion, no oil as it leaves residue on clothing garments.

9: not in your Sunday’s Best.  Please wear a button or zip down shirt to the shoot in a dark colour to wear while you have your hair & makeup done, or bring a robe. Something you don’t mind getting makeup or powder on.

10: the same. Do not make any crazy changes to yourself after you have been cast for the shoot! This means, don’t go tanning, don’t get 5 inch acrylic nails, don’t change your hair colour, don’t get a drastic haircut, don’t get more tattoos or piercings, and don’t gain or lose any weight. Unless you’ve discussed any of these changes with the shoot organizer/photographer, do not make any changes to yourself once you have been cast. The shoot depends on you showing up looking like you looked when you were given the job, so no changes please.

Coming prepped saves time, money and mostly… it makes you look more professional and desirable to work with again. With this list, you are now ready!

Summer’s Here!… And So Is Your Shiny Skin?

A reader requested some suggestions on a great primer for oily skin, and since this is the season for oiliness, I thought to repost it here & add a few updated product suggestions.

So…Personally and dermatologically speaking, I don’t recommend that anyone use any primer, ever, on a daily basis. That being said, primers are great for a special night out or occasion or even if you have a long day of meetings and need to impress or have no time to worry about touching up your makeup.

I wouldn’t recommend a primer daily because it isn’t particularly good for your skin… It’s purpose is to impose a barrier between your skin’s oils and your makeup or to stop your skin from being oily altogether which isn’t good for the skin. If your skin produces too much oil there are always several reasons and sometimes it’s best to consult your doctor or dermatologist. It could be over-washing, stress, etc. but before finding ways to conceal oiliness, I would recommend finding ways to treat and balance the skin first.

Now down to business. The number one recommended primer for oily skin is the Laura Mercier oil free primer. You can easily pick it up at Sephora or order it online. It’s completely water based so it works well in not adding any oil as well as providing a smooth makeup application for oily skin types. If you’re using mineral makeup or powder with this primer instead of a liquid foundation, you’ve gotta give it a few minutes to dry… or it can end up altering the colour of your makeup as you apply it. If you’re very invested in making sure you’re totally oil-free then I would pair this with the Laura Mercier oil free foundation too. CoverFX also makes a great oil control powder to blot with and to powder on top of your oil-free foundation to really set your skin with a matte look.

A favourite system of mine for those with normal skin and T-zone oiliness is the Smashbox Photo Finish primer paired with the Smashbox mattifier in the T-zone since I find none of my clients want that ‘all over matte’ look which is not very natural looking.

*New fave* The Too Faced Primed & Poreless Pure Oil-Free Skin Smoothing Face Primer For Sensitive Skin. It’s quite a mouthful but it really works wonders!

To make your makeup last longer try a setting spray. The Model in a Bottle spray works well; I’ve used it on clients but find it’s not easy to find and a little pricier than other alternatives. Some people swear by the Urban Decay “All Nighter” setting spray. Personally I favour the Ben Nye “Final Seal” for my clients as I find no one has ever broken out with any skin problems after I use this on them and the makeup stays the same after I apply it; I’ve even had clients tell me their makeup looked the same in the morning after forgetting to wash their face at night! The MAC “FIX” setting spray has a lot of reviews that it works great (although not cheap) but for sensitive skin users to beware that it often causes break outs and leaves the skin slightly shiny (which I think defeats the purpose) and the skin needs to be re-powdered after use.

P.s. There is an urban myth that using ‘milk of magnesium’ on the face can stop all oiliness in its tracks for hours on end and is rumoured to be used behind many a runway show. However, I’ve never tried it, I also don’t recommend you do either, but I’ve never heard of a makeup myth that didn’t have some truth to it 😉

My Love/Hate Relationship

I love makeup, I truly do. But I hate the fact that because I have a mild makeup shopping problem, my whole bathroom suffers. Not to mention that the more product I have,  means the more heavy my kit is when schlepping around town servicing clients. One of the items I love the most in my kit, I tend to often times leave at home. In a box.

It’s ‘pigment pots’. MAC has pigments, Gosh has Gosh pots, Lise Watier has Folies, NYX has pearl powders. They’re all loose pigment eye shadows that come in individual pots or containers. They apply with a sheer pop of highly pigmented colour when dry or give a big burst of concentrated colour when wet or if primed properly. I love using these but I just can’t justify lugging them around. I usually bring my 2 most used colours with me, my close-to nudes, and leave all the rest on my makeup table at home. It’s so sad.

So I finally decided to press my pigments. I had tried this a couple years back but didn’t really like the result. I found my pigment was just too crumbly which led to wasted product & lots of fall-out. So I heard a voice in my head that said to use a lower percentage alcohol & see what happened. And very good things happened.

I’ll start off with what you need:

1: A tool. I used my pro stainless steel double ended spatula. You could use a plastic spatula, teaspoon, cocktail fork, etc or a combination of all of those. You need something to scoop up/out the pigment and mix it.

2: Empty pans. Empty metal pans… I used some old blush ones that I stuck magnetic stickers to the bottom of (to use with my Z palettes), some old square L’oreal eyeshadow pots, some broken 120 palettes pans, and some Yaby empties. It doesn’t matter where they’re from or if you’re recycling old pans or not, just be sure to properly cleanse them and disinfect with alcohol prior to re-use.

3: Rubbing alcohol. I suggest 50%. I had used the 99% pro type rubbing alcohol and it evaporated too quickly which is what I think led the product to it’s crumbly state. The 50% will evaporate more slowly and although it takes longer to set, it will allow the product to set better and form better in the pan.

4: Pigments. Some brands may have difficulty in pressing. I used Makeup Forever, Lise Watier, Gosh, NYX and a cheaper brand called Lanmei that I never heard of until one of my suppliers sent me a ton of them along with an eyelash shipment. All of the above worked really well.

5: baby wipes for clean up of your space, and you (I was a hot mess afterwards) and paper towels should be placed all over your work space.

To Press Your Pigments:

1: Start by filling your empty pan with pigment. A scoop of pigment and a drop of alcohol at a time until the pan is full, and you have a thick paste-like consistency.

2: Mix mix mix.

3: Tap tap tap.

4: Wait until dry.

5: You might choose to press them (literally) with a penny/quarter/dime depending on the size of your pan. I chose to press a few, but not the larger ones. In pressing, you can wrap a tissue around your money and press it flatly into the pan of pigment. You can also choose to wrap a patterned cloth around your coin and press in a fancy schmancy design. I skipped all that. After 3 hours of mixing pigments, I was not feeling fancy or schmancy.

6: Enjoy the fruit of your labour.

I took some photos to show what I managed to do.

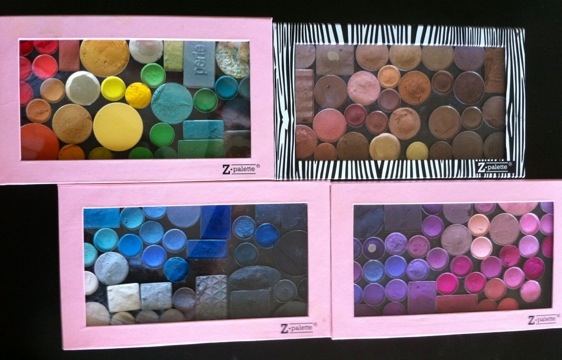
I MAJORLY downsized my pots of pigments into several flat pans:

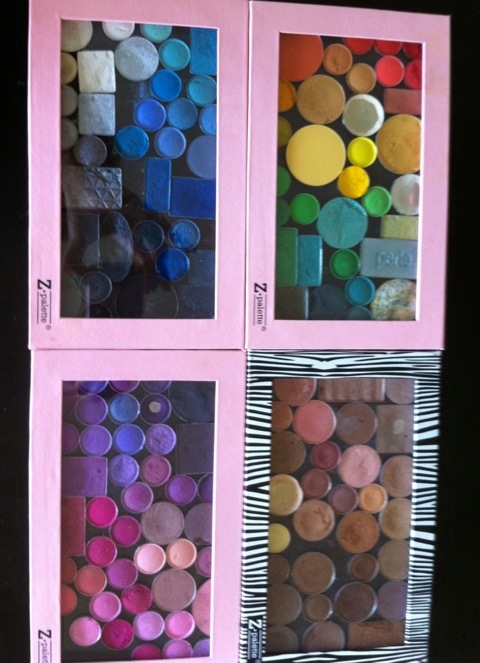
This was the waiting part:This was the end result, with 21 pots of different pigments being downsized into 21 pans of pressed pigment eyeshadows that all fit in to 1 Z-Palette:

Lastly, I  swatched my Lise Watier Folie D’Or from the pot and from the pressed pigment pan after it was dry to test for any colour change at all and I could see none. The only thing it seemed that happened was the colour from the pressed pan seemed more pigmented and would require a light handed application if I wanted it to appear very sheer.

(right side is non-pressed, the left side had been the pressed one)

All in all, I am very happy I finally pressed my pigment pots! Now I can carry around 21 pots of colour in just 1 Z-Palette, and actually, there’s room for a few more pans… hmmm….

MAC/Estee Lauder Sale HAUL!

This gallery contains 20 photos.

My Trip to the MAC/Estee Lauder Sale… And all the amazing stuff I got! 😀 Pic 1: All Bumble and bumble hair stuff… Straight styling product (50ml), Straight Shampoo (60ml), Creme de Coco conditioner (50ml) and Creme de Coco shampoo … Continue reading

The joy of NEVER depotting

So yesterday I got my Z-palettes in the post, which I ordered from Camera Ready Cosmetics during the 50% sale, for $9.97 each (just under half price).

*As a side note, it was cheaper to order from CRC than from Z-Palette directly, not just because of the sale, but also because shipping to Canada was pretty much double on the Z-Palette website.

So I began depotting. This is where you heat up your terribly heavy plastic packaging that your makeup comes in & melt that sucker down until the glue loosens on the bottom of the eyeshadow/blush & you can take it out easily. There’s loads of YouTube videos on how to do this properly. Some people like the oven method, I find it always melts the packaging before the glue & makes getting the product out super hard. Some people like the lighter/candle method which I quite like for items that come in a palette so you can do each colour individually. And some people like the flat iron method which I quite like for bulky single packaging like a Nars blush or a Revlon eyeshadow. All ways are equally time consuming, some are just more or less messy than others.

Then I arranged my colours in a way that made sense to me: blues with black & whites (my highlight & contour shades), pinks & purples, greens & yellows & oranges, and my earth toned neutral palette of browns, taupes, champagnes, & light shimmers. Aesthetically, I think it gave me a makeupgasm when I saw how lovely everything looked after all that hard work & sweat.

But what really inspired me to write this post was not to talk about depotting… But to talk about the art of NOT depotting. The thought of being able to get away with never depotting makeup again feels almost like a sin, because the thought alone feels so damn good. I hate depotting. It sucks. You get nearly stabbed many times & nearly burned just as many times if not more. So why are we still depotting?

Well, if you’re a drugstore makeup buyer and love your Revlons & L’oreal’s then depotting may be your sport. Or if you’re a makeup snob & love some lovely Nars or Tarina Tarantino $30+ makeup, then depotting could be a good stress release from thinking about how light your wallet feels. But… If you’re either a pro artist or just a consumer with the idea of quality over branding, then let me take you to a place I call, “Never Depot Again Paradise.”

In this Paradise, there exists a multitude of professional grade eyeshadows, blushes, lip colours & powders that have NEVER been potted. You can order them, and they arrive with NO packaging to melt. These products are amazing. And when you measure them gram for gram beside some of the drug store products, you’re often getting 3-6 times more product for less than half the price.

My faves: La Femme. The blushes are AMAZING and the eyeshadows are pretty fabulous too. The size is HUGE and you get tons of product for less than $3. You can purchase La Femme online. Cheapest price I’ve see on their Eyeshadows: http://www.makeupmania.com/products/La-Femme-%252d-Pressed-Eyeshadow-%28Pan-Only%29.html although I find the shipping prices to Canada from CRC make it cheaper to buy here: http://camerareadycosmetics.com/products/la-femme-eye-shadow-pans-refills-large.html
And the cheapest price I’ve seen on their blushes: http://www.makeupmania.com/products/La-Femme-%252d-Blush-On-Rouge-%28Pan-Only%29.html and ditto to the above so click here if you’re a Canuck: http://camerareadycosmetics.com/products/la-femme-blush-on-rouge-refills.html

My second favourite is the Ben Nye. The eyeshadows rate a little bit higher than the La Femme because the pigment is a bit stronger, but the blushes are just as nice as La Femme’s are but you’ll get a colour differentiation here. Eyeshadows: http://camerareadycosmetics.com/products/ben-nye-eyeshadow-refills.html and their blushes: http://camerareadycosmetics.com/products/ben-nye-powder-cheek-rouge-refill.html

Now you can stick these guys into your Z-Palette or pro palette easily and never worry about depotting OR the extra cost you’re paying for all the unnecessary packaging. And this is the beauty of using a Z-Palette to organize your makeup while never depotting a piece of eyeshadow ever again.

20120322-020532.jpg

20120322-020558.jpg

Is More Makeup Product any Better or Cheaper?

I stumbled on a post from a renowned Makeup Artist that many of us know of and his post absolutely shook me to my core. This was months ago and ever since, I’m paying even closer attention than I was before whenever I’m shopping or looking for a new makeup item to add to my kit. The argument of quantity vs. quality vs. price has been a big one for makeup artists and many of us have learned this lesson the hard way, by buying loads of expensive and unnecessary stuff, but I hope that in sharing his post and sprinkling a little of my wisdom on top, I can save new and old makeup artists some makeup dollars and maybe get some regular consumers to start looking at purchasing some new and worthy products.

In the below from KJ Bennett’s blog, he measures out the price per gram of some of the most popular eyeshadows that are all considered “PROFESSIONAL GRADE” (minus the Coastal Scents) and we get to see which ones offer us the most bang for our buck.

It’s VERY important to note the gram weight vs price of each individual pan. These refill pans look alike due to their diameter, but some are deeper and contain more product.

I’m listing from the lowest gram weight to the highest in a standard 1.5″ diameter eyeshadow pan.

Coastal Scents “Hot Pots” Refill Eyeshadow – 1.3 grams – $4.49 ($3.45 per gram)

MUFE Professional Single Refill Eyeshadow – 1.75 grams – $13.00 / $7.80 after 40% pro discount ($4.46 per gram after discount)

Kryolan Professional Single Refill Eyeshadow – 2.5 grams – $4.99 ($2.00 per gram)

Ben Nye Professional Single Refill Eyeshadow – 3.5 grams – $6.00 ($1.71 per gram)

Graftobian Professional Single Refill Eyeshadow – 5.1 grams – $9.99 ($1.96 per gram)

La Femme Professional Single Refill Eyeshadow – 5.5 grams – $2.99 ($0.54 per gram)

I even looked at drugstore makeup and was shocked at the prices! It’s not very affordable at all.

L’Oreal HiP Studio Secrets Professional Matte Eyeshadow Duo (same 1.5″ diameter size split into 2 half moon pans) is $9.99US.

You can purchase TWO full size Kryolan Eyeshadow Refills for $9.98 US

NOTE – I didn’t include the MAC or Inglot refill in the side-by-side list above because they do not use the standard pan size. But here’s the gram weight to price breakdown anyway.

MAC Pro Palette Refill Eyeshadow – 1.5 grams – $11.00 / $6.60 after 40% pro discount ($4.40 per gram after discount)

Inglot Freedom Palette Refill Eyeshadow – 2.7 grams – $5.00 ($1.85 per gram)

Interesting Discovery – Look at the prices per gram …WHAT AN EYE-OPENER! You’ll see that some of the most popular mainstream “Pro” products are quite expensive when broken down per gram. I was actually shocked at some of the prices …even after the discount.

(drum roll please)
The Final Breakdown

BEST BUY – LA FEMME! Their blushes are amazing and at $0.54 per gram, a beginning artist or makeup maven could stock their kit on quite a budget. The pigment is fantastic and works well even on darker skin tones.

Second Place: Ben Nye comes in at $1.71 per gram. And, I can confirm that even though the price is insanely low, the quality and pigment levels in the Ben Nye eyeshadows are equivalent to the most expensive pro shadows.

SPECIAL KUDOS – Inglot Freedom Palette Refills came in second place. The quality of their matte shadows are amazing for the price.

http://kjbennett.com/mega-eyeshadow-palettes-quantity-vs-quality


This was an amazing and heart stopping blog post for me! I’m so glad that someone finally did this and measured it out so that we could see in black and where we should put out makeup money. Thanks KJB!